Hello again my Photonauts… Welcome to this tutorial in which I will be doing a background replacement using Luminar Neo only.
Replacing a background is something that at any point a photographer and/or graphic designer will need to do. There are some cases where you would like to have a subject or an object isolated from the background or you might want to change the scenery, place, etc.
As a photographer I always recommend planning ahead and setting the background scene, color or mood of the final picture before starting the photoshoot.
What I mean is that changing a background is not an easy thing and sometimes it could be really frustrating. So if you ask the proper questions or shoot different versions with different backgrounds, it will be muuuuuuch easier to have the background we want from the beginning.
If we don’t have that option, maybe because a client was not clear or you are asked to change the background of a photograph that is not yours, we have alternatives and software that can speed up the process and help us.
Luminar Neo is a software that is built based on artificial intelligence(AI) systems that will help you and me do things faster and with excellent results. AI is not a bad thing or is taking away our jobs, I think it helps experienced and beginners to speed up and save time in complex edits like changing the background of a photograph.
One of the advantages of using Luminar Neo is that the AI system will take care of the masking process to separate the subject from the background in just one click. You will find this option under the layer properties of the edit section of the program.
Once the background is removed you have the option to refine the edges of the isolated subject and fine tune it. If you come from the Photoshop world you may feel that you have tools missing, but the principle of Luminar Neo is to make things and processes as easy as possible so beginners can achieve great results.
I am not saying that one software is better than the other. I mean that according to your budget and experience you can start with AI as your ally and if you have the need to have “full control” then use a software like Photoshop.
Check it out!
One click edits
Edit your photographs in no time with excellent resuts. Presets, AI adjustments to transform your photos from great to WOW!
Change Background
Use the powerful background removal AI system to erase the background and replace it wtih one of your liking.


Steps to remove the background of an image in Luminar Neo:
It is that easy! just a few navigation menu clicks and only one clik to have the software scan/remove the background.
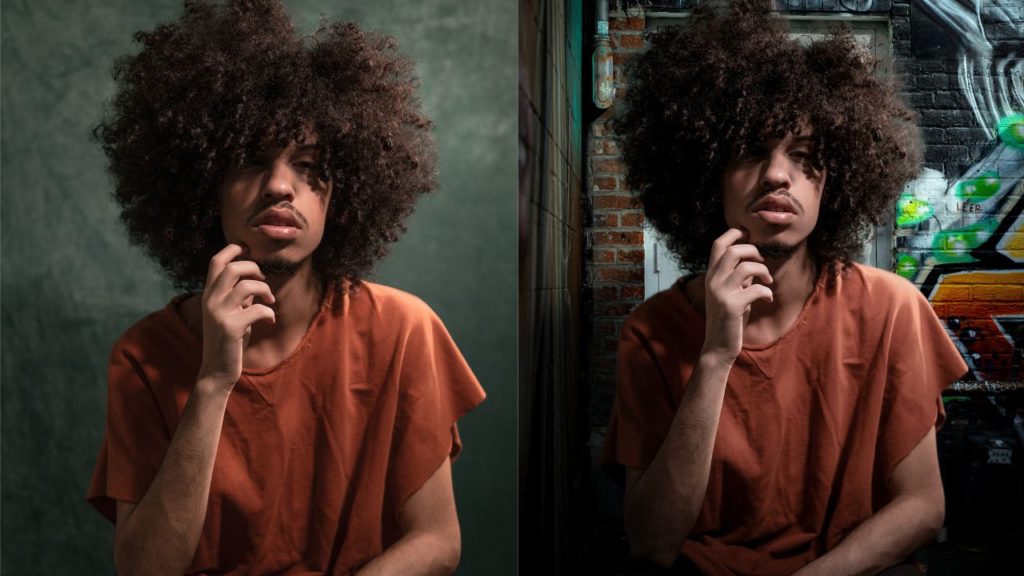
Once the background is removed you can bring in the background you want to use. There are certain recommendations or questions you may ask yourself before importing the background:
Is the light pattern of the background matching that of my subject?
It is important to have a background that has the same direction of light as that in your subject. I mean light direction, intensity and fall-off.
If you take a closer look at the final composition of the photograph I used in the tutorial, you will notice that the subject is lit from camera right and if you also check the background I selected, you will see that the main light is coming from the right as well.
I use this principle especially when I will use an outdoor/scene background. If you plan to use a solid color background you could use a different light pattern like one mimicking a background light in a studio or an overhead light.
Is the tone and color of the background close to the light color of that of my subject?
Another consideration is the color and tone of the new background. Try to use backgrounds that are close to the mood and color of the subject setting. Even Though you can edit the color and tone to match each other, it is a good practice to use similar color/tone backgrounds.
Steps to import the background image in Luminar Neo:
To bring a new background in Luminar Neo once you have removed the original background, you will need to import it to Luminar Neo and then apply it to the photograph you are editing in the following order:
Once you have edited, color corrected and perspective matched the new background to the subject, you will only need to export the photograph in the format needed.
If you want to add additional adjustments like vignette, other adjustments or apply a preset to the overall composition, I mean to the flattened(merged layers) the image and not to a particular layer, you need to export the picture and then reopen it as a single picture.
Luminar Neo doesn’t have for the moment a “flatten” or merging option, so this export and re-open step is needed. I don’t think it is a bad thing as it will let me apply other presets or adjustments without the layers selection hazzle.
I hope you like this tutorial and if you like to check the program just click here: Luminar Neo
(this is an affiliate link and I will get a commission)
¡God bless you!
Jose


So great demo but I am confused why step 7 in replacing with new background you put subject on top and say when it appears click remove???? Wouldnt you only be left with the new background.
Hi Nancy, I put the subject layer on top to remove the background of it(subject layer) and let the new background(bottom layer) show… makes sense? Thanks for commenting!