Mastering the Art of Panorama Photography: Unlock a World of Breathtaking Landscapes
Attention, photography enthusiasts! Are you ready to embark on an exhilarating journey through the world of panoramic photography? Get ready to expand your creative horizons and capture sweeping landscapes like never before.
In this quick guide, I will unravel the secrets behind shooting stunning panorama photographs and seamlessly stitching them together, all while maximizing your shooting gear, optimizing camera settings, and following best practices. Get your cameras ready and let’s dive in!
Why now is the best time to take panoramic photos?
Now is the perfect time to delve into panorama photography. As the world opens up with new travel opportunities and breathtaking vistas await, you don’t want to miss the chance to immortalize those awe-inspiring moments. The sooner you master this technique, the sooner you can create stunning, wall-worthy prints that will transport you back to those breathtaking locations.
What makes panoramas different?
Panorama photography offers a unique perspective that goes beyond the limitations of a single frame. By capturing a wide field of view, you can encompass the grandeur of majestic landscapes, bustling cityscapes, and immersive environments that leave a lasting impression. Unleash your creativity and stand out from the crowd by mastering this art form.
What will you get in the guide to shoot panoramas?
This guide will provide you with specific instructions, recommendations, on shooting and stitching panoramas. We will explore the essential gear required, including tripods, wide-angle lenses, and specialized panorama heads. You will learn how to set up your camera for optimal results, adjust exposure settings, and capture multiple images seamlessly.
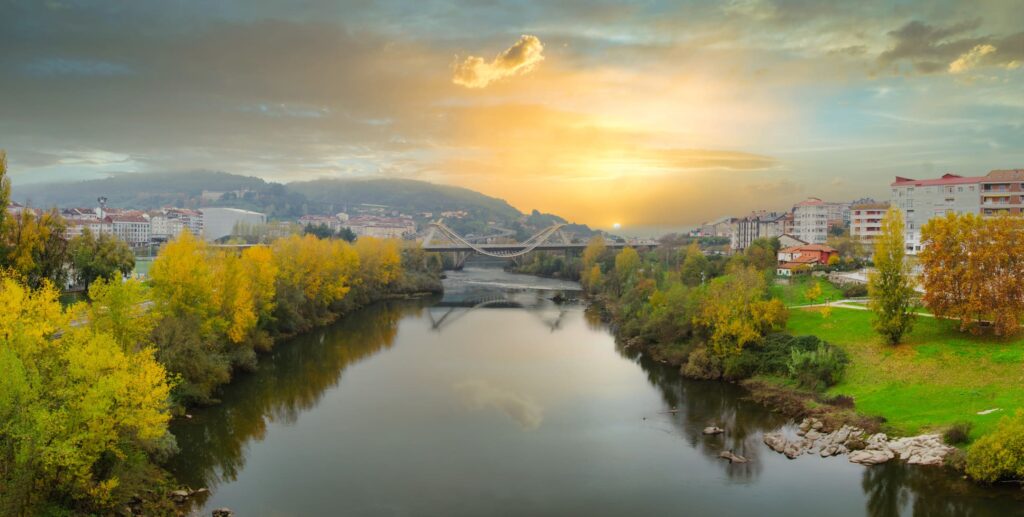
“In a single frame, a panorama tells a story that stretches beyond the limits of perception, inviting us to explore the wonders of our surroundings.”
Gavin Hoey
For whom is this guide aimed to?
Whether you’re a hobbyist or an amateur photographer, this guide will equip you with the knowledge and skills to elevate your photography game. With practical tips and best practices, you’ll learn how to compose panoramic shots effectively, identify suitable subjects, and overcome common challenges like exposure variations and parallax errors. Additionally, we will recommend popular software tools for stitching your images together, ensuring a smooth and professional final result.
Best Practices and Recommendations:
Throughout this guide, we will share invaluable best practices. From scouting locations and selecting the right shooting time to achieving precise overlap between frames and avoiding distortions, you will be armed with the know-how to capture breathtaking panoramas. We’ll also delve into advanced techniques, such as vertical panoramas and using neutral density filters for balancing exposures in high-contrast scenes.
So, are you ready to immerse yourself in the world of panorama photography? Prepare to unlock a whole new level of creativity and capture the beauty of our world in its entirety. Get ready to stitch together memories that will transport you back to those awe-inspiring moments. Join us on this captivating journey and let your panoramic masterpieces mesmerize all who lay eyes on them.
Remember, the world is waiting to be explored through your lens. Let’s capture it in all its panoramic glory!
QUICK Guide to Shooting Panorama Pictures
Download PDF (No subscription required)
Photography Gear Needed: (all links to Amazon broad search)
| Gear | Description |
| DSLR or Mirrorless Camera | A camera with manual controls and interchangeable lenses. |
| Wide-Angle Lens | A lens with a focal length of around 24mm or wider to capture a wider field of view. |
| Camera Tripod | Provides stability and ensures precise alignment between shots. |
| Panorama Head | Optional but recommended for more accurate and seamless stitching. |
| Remote Shutter Release | Helps minimize camera shake during longer exposures. |
Shooting Techniques:
- Set up your tripod: Choose a stable location and level your tripod. Ensure it is firmly locked to prevent any movement. If you don´t have a tripod, hold the camera firmly with both arms close to your body and rotate your waist.
- Camera settings:
- Set your camera to Manual (M) mode for full control.
- Use a low ISO (e.g., ISO 100 or 200) to minimize noise.
- Set a narrow aperture (e.g., f/8 or higher) for a greater depth of field.
- Choose a suitable white balance setting (avoid auto) and shoot in RAW for post-processing flexibility.
- Compose your shot:
- Start by capturing a test shot to determine the desired composition.
- When ready put your hand on front of the lens to have a reference photo that marks the sequence starting point.
- Consider using the rule of thirds or leading lines to enhance visual interest.
- Overlap each frame by around 30% to 50% to ensure successful stitching.
- Shooting sequence:
- For horizontal panoramas, rotate your camera to a portrait (vertical) orientation. Capture images from left to right (or vice versa) to maintain consistency in terms of height and width.
- For vertical panoramas, keep your camera in landscape (horizontal) orientation. Capture images from bottom to top (or vice versa) to maintain consistency in terms of width and height.
- Use manual focus or focus lock to maintain focus throughout the sequence.
- Take your time and avoid rushing to maintain accuracy.
Best Practices:
- Shoot in aperture priority mode: If the lighting conditions change across the scene, shooting in aperture priority mode allows the camera to adjust the shutter speed automatically while keeping a consistent aperture setting.
- Use manual exposure: To ensure consistent exposure settings across all frames, switch to manual exposure mode after setting the exposure for the first shot.
- Avoid using polarizing filters: These filters can cause uneven skies in the stitched panorama. If necessary, manually adjust the polarizer’s position for each shot to maintain consistency.
- Bracket your shots: If the scene has a wide dynamic range, consider capturing bracketed exposures to blend them later for better tonal balance.
Recommended Panorama Stitching Software:
| Software | Description |
| Adobe Lightroom Classic / Photoshop (PAID) | Offers powerful panorama stitching capabilities and seamless integration with RAW editing. |
| PTGui (paid) | A comprehensive stitching software with advanced features and excellent control over the stitching process. |
| Hugin (FREE) | An open-source software that offers a wide range of features for panorama stitching, including control point-based alignment and exposure blending. |
| Luminar Neo (PAID) | An AI-powered software developed by Skylum, ideal for beginners and photo hobbyists, providing easy-to-use panorama stitching features along with various creative editing options. |
Remember, practice makes perfect when it comes to shooting panoramas. Experiment with different compositions, lighting conditions, and techniques to develop your unique style. With the right gear, shooting techniques, best practices, and software tools, you’ll be well on your way to capturing stunning panoramic images that transport viewers into immersive landscapes. Happy shooting!